 kevyt
Help
How to get started with Kevyt, set up AI, and understand what the app shows you.
Getting started
- Set up your profile. When you first open Kevyt, choose metric or imperial units and enter your sex, year of birth, height and current weight. These are used for your calorie target. You can add your first goal (a weight and a date) straight away, and more goals later in Settings: several milestones on the way to your final one. Kevyt is for adults aged 18 and over. Already using Kevyt on another phone? Choose I already use Kevyt: bring my data back instead (see backup and sync).
- Weigh in. Add a weigh-in on the Weigh-ins tab whenever you step on the scale. There's one weigh-in per day; adding another for the same date replaces it. Daily weigh-ins give the smoothest trend, but any rhythm works.
- Add holidays (optional). Under Settings → Holidays, add periods where you expect to pause the loss, or to gain a little (you say how much per week). The forecast takes them into account.
- Start logging food (optional). The Food page shows your calorie target for the day and what you've eaten so far.
Bringing your weight history
If you already track your weight elsewhere, go to Settings → Data → Import weigh-ins from a file, or paste the text. Kevyt expects a date and a weight on each line, for example 2026-11-12,102.6 or 12.11.2026;102,6. It understands several date orders, a decimal comma or point, and Excel date numbers, so most spreadsheet exports work as they are, and it tells you how it read the dates. Export weigh-ins in the same place saves them back to a file.
Reading the dashboard
The Analysis section at the top sums up how you're doing in plain words: how much you've lost, and how many weeks until your next goal. Everything below it is the detail.
| You see | What it means |
|---|---|
| Weigh-ins and trend | Your weight jumps around from day to day because of water, salt and food in your stomach. The trend line smooths that out and shows where your weight is really heading. |
| Plan | The steady line from your start to your goals. Its pace is set by your next goal and when you want to reach it. |
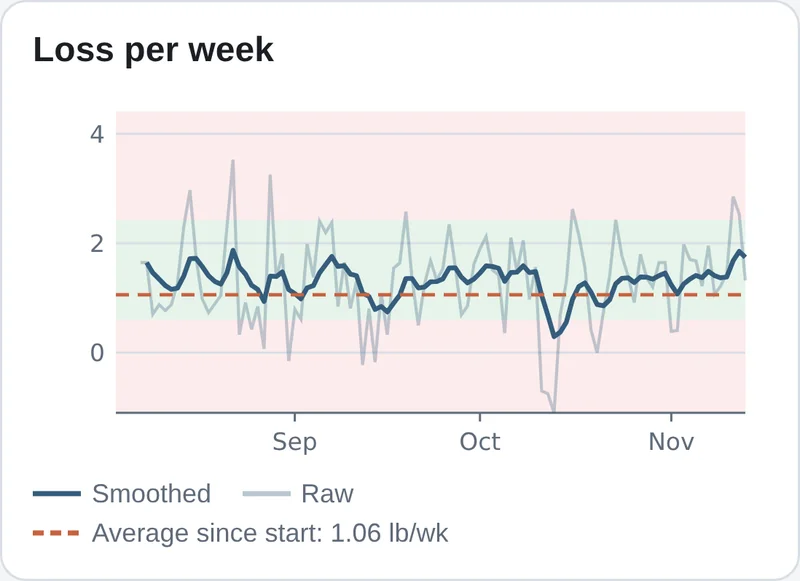
| Loss per week | How fast you're losing, as a smoothed and a raw line. The line appears once you have weigh-ins on at least 4 of the last 8 days. The green zone marks how far below or above your planned pace still counts as fine; you can change it in Settings. |
| Forecast | Where your weight is likely to go if you continue at your pace of the last 4 weeks, allowing for losing a little more slowly as you get lighter. The middle line is the most likely path; the shaded bands show the 50% and 90% ranges. They widen the further ahead they look, because the future is less certain. The forecast stops at your final goal. |
| Probability | For each goal, how likely you are to reach it by its date. Kevyt runs many simulated futures based on your own recent ups and downs and counts how many reach the goal in time. |
| Shaded periods | The holidays you've entered. |
Food diary and calorie target
Log food per meal: breakfast, lunch, dinner and snacks. You can
- search the built-in list of about 7,400 foods, which works offline (names are in English);
- search packaged products online, or scan a barcode (or type its number) using Open Food Facts;
- create your own foods and recipes (recipes show nutrients per portion);
- repeat a meal with Same as yesterday;
- log from a photo or a description, if you've set up AI (see below).
Besides calories, the diary shows protein, fat, carbohydrates and fibre.
How the calorie target is set
Kevyt estimates how much energy you use in a day from your profile (the Mifflin–St Jeor formula, adjusted for everyday activity). It then subtracts the deficit needed to reach your next goal on time, counting about 7,700 kcal per kilogram. The target never goes below a safe minimum. If your goal would need a very aggressive pace, Kevyt warns you and suggests talking to a doctor.
Training
Training is off by default. Turn it on in Settings → Training, and the Food page gets a Training card where you enter the activity, the calories burned and, if you like, the minutes. A training day raises that day's calorie target by a share of the calories burned: 50% by default, adjustable from 0 to 100%. Counting only part of it is deliberate, since calorie readings from watches and machines tend to run high.
Setting up AI
Kevyt doesn't include AI of its own. You connect a provider you choose, with your own key, and the app talks to it directly. Everything else in Kevyt works without AI.
- Get an API key from your provider. Look for "API keys" in your account on their developer site: for example the OpenAI Platform, the Anthropic Console, Google AI Studio, Mistral's console or OpenRouter. Most providers ask you to add a payment method or prepaid credit first.
- In Kevyt, go to Settings → AI → Set up an AI provider and choose your provider. That fills in the address. Built-in choices: OpenAI, Anthropic, Google Gemini, Mistral, OpenRouter and Ollama. Any other OpenAI-compatible service works too; just enter its address.
- Paste your API key. It's stored in your phone's secure storage and is never included in an export.
- Tap Test and list models, then pick a model from the list your provider offers. For photos, the model must be able to read images. A smaller, faster model is usually enough for logging meals and costs less; try a larger one if you're not happy with the results.
Costs: your provider bills you for what you use. A single meal photo or review is a small request, but prices differ between providers and models, so check your provider's pricing page. Settings → AI shows your use over the last 30 days: the number of requests and the tokens (the units providers bill by), so you can compare with your provider's price list. Switch AI off and forget the key removes the connection again.
Running a model yourself
If you run a model on your own computer, for example with Ollama, choose the Ollama preset and replace YOUR-SERVER in the address with your computer's address on your home network (for example http://192.168.1.20:11434/v1). Leave the key empty. Nothing leaves your network then. To log from photos, the model needs to understand images.
What the AI features do
Log from a photo or description
Go to Food → Add food → Photo or description. Take or choose a photo, describe the meal, or both, then tap Estimate. The AI names the foods and estimates the amounts in grams. The calories always come from Kevyt's food list, never from the AI. You check everything on a confirmation screen before it's saved, and you must resolve any item Kevyt couldn't match. Estimated entries are marked with ≈, and the day shows a likely calorie range.
Before the first request to a provider, Kevyt asks for your consent. Photos are made smaller and stripped of location and other metadata before they're sent, and they aren't stored.
Reviews
Ask for a review of a day or of the last seven days from the Dashboard or the Food page. Kevyt calculates the numbers itself: weight against plan, pace, calories against target, protein, training and more. With Get feedback, only those numbers go to your AI, which writes a short summary with at most two recommendations. Tap Show exactly what is sent to see it first.
Meal plans and suggestions
Open Meal plan on the Food page and set your food preferences first: diet (everything, pescatarian, vegetarian or vegan), allergies and intolerances, cuisines, ingredients you like and want to avoid, cooking skill and time, how many people you cook for, meals per day and budget. Then choose Create plan with AI for 1 to 7 days (each day takes about 10 to 30 seconds), or Plan by hand from my recipes. For an AI plan, the AI proposes the dishes and Kevyt works out the nutrients, scales the portions to your calorie target and checks each day for protein, fibre and variety, asking for a new proposal if a day doesn't pass. You get the recipes and one shopping list for everything planned.
Diet type and allergies act as strict filters, and a meal that breaks them is never kept. Still, always check product labels if you have an allergy.
Suggest a meal (under Add food) gives three ideas that fit what's left of the day's calories and protein.
Your data, backup and sync
Everything is stored on your phone. There's no Kevyt account and no Kevyt server. Everything below is in Settings → Backup and sync.
Files
- Export everything saves everything you've entered (weigh-ins, goals, food diary, recipes and more) in one file, to keep or to move to another phone.
- Import a Kevyt export merges such a file into the app. Nothing is duplicated: for each record, the newer version is kept.
- Export food diary (CSV) gives you the diary for a spreadsheet. Weigh-ins have their own CSV export under Settings → Data.
Your AI key and cloud password are never part of a file.
Backup and sync in your own cloud folder
Kevyt can keep a daily backup in a WebDAV folder you own and keep several phones in step through it. WebDAV works with Nextcloud, most home NAS devices and many storage providers. Use an empty folder made just for Kevyt.
- Enter the folder address (starting with
https://), your user name, and your password. If your storage offers app passwords, use one of those. - Optional: an encryption passphrase. With one, everything is encrypted on your phone before it's uploaded, so your storage provider can't read it. Choose carefully: a folder is encrypted or not from the start, and a forgotten passphrase can't be recovered. Without it, the folder can't be read.
- Tap Connect. Kevyt sets the folder up, or joins it if another phone already uses it.
From then on, Kevyt syncs whenever you open the app and writes a backup once a day. Each phone keeps its last 10 backups. You can also tap Sync now or Back up now, and Restore from a backup merges an older backup into the phone. Kevyt doesn't sync while the app is closed.
If two phones changed the same entry, the most recent change wins.
Setting up your cloud folder: examples
A few things apply to every storage:
- Kevyt needs the WebDAV address of one folder. The address you see in your browser while looking at your files is usually not the WebDAV address.
- Kevyt creates the last folder in the address if it's missing, but the folder above it must already exist.
- Folder names are case-sensitive:
kevytis notKevyt. - Kevyt uses one cloud folder at a time. Connecting a different folder starts fresh there, and everything on the phone is uploaded to it.
- Prefer addresses starting with
https://. Withhttp://, your user name and password travel unencrypted. That's acceptable inside your home network, but not over the internet or public Wi-Fi.
The addresses below are examples. Replace the parts in capitals with your own.
Synology NAS
- In the Package Center, install and start WebDAV Server. It uses port 5005 for http and 5006 for https.
- Under Control Panel → User, make sure your user may use WebDAV (tab Applications). Even better: create a separate user that can only reach the Kevyt folder.
- Use the shared-folder name in the address, not the disk path. For a folder
Kevytin your home folder:https://NAS-ADDRESS:5006/home/Kevyt
orhttps://NAS-ADDRESS:5006/homes/USERNAME/Kevyt - User name and password are your NAS login. With two-step sign-in turned on, you'll probably need a separate account without it.
Common mistake: an address with the disk path, such as …/volume1/homes/…. The NAS then answers that it doesn't accept files at this address.
Nextcloud
- The address has this form:
https://YOUR-NEXTCLOUD/remote.php/dav/files/USER-ID/FOLDER
for examplehttps://cloud.example.com/remote.php/dav/files/anna/Documents/kevyt. If your Nextcloud runs in a subfolder, keep that part before/remote.php. - The easiest way to get it right: in Nextcloud, open Files → Files settings (bottom left) and copy the WebDAV address shown there. Then add your folder's path to the end.
- The user ID in the address must be exact. It isn't always what you type to sign in, for example if you sign in with your email address. A wrong user ID gives "not found".
- Use an app password: Nextcloud Settings → Security → Devices & sessions → Create new app password. It's required if you use two-step sign-in, and you can revoke it later without changing your main password.
The address of the Files page in your browser (…/apps/files/…?dir=/Documents/kevyt) only tells you the folder path. It's not the address to enter.
Hetzner Storage Box not yet tested with Kevyt
- In the Hetzner Console, open your Storage Box, choose Change settings and turn on WebDAV support and External reachability (without it, the box can't be reached from your phone). It can take a few minutes before WebDAV works.
- Address:
https://USERNAME.your-storagebox.de/kevyt, where USERNAME looks likeu123456. - User name and password: those of the Storage Box.
Tip: create a sub-account just for Kevyt (address https://u123456-sub1.your-storagebox.de/kevyt). A sub-account only sees its own folder, so the phone never holds the login to the whole box.
Koofr not yet tested with Kevyt
- Address:
https://app.koofr.net/dav/Koofr/kevyt. The part/dav/Koofris your Koofr storage;kevytis the folder for Kevyt. - User name: the email address of your Koofr account.
- Password: Koofr only accepts an app password for WebDAV, not your normal one. Create it on the Koofr website under Preferences → Password → App passwords.
Common mistake: leaving out /Koofr (for example …/dav/kevyt). Koofr then refuses to create the folder.
Other storage
Any storage that offers WebDAV should work, for example ownCloud, another NAS brand, or a hosting provider. Look in its help pages for "WebDAV", and use an app password or a separate account if it offers one.
When it doesn't connect
| The app says | Usual cause |
|---|---|
| "The storage does not accept files at this address…" | Wrong folder path: a disk path instead of the share name (Synology), a wrong user ID or folder name (Nextcloud), or the folder above the Kevyt folder doesn't exist. |
| "The storage refused the user name or password." | Wrong login, WebDAV not allowed for this user, or the storage needs an app password. |
| "The folder could not be reached…" | Wrong address or port, or the phone isn't on the same network as your home NAS. |
| "This folder is encrypted. Enter its passphrase." | You're joining a Kevyt folder that was set up with a passphrase. Enter the same one. |
| "The passphrase does not fit this folder." | The passphrase is wrong. |
| "This folder is in use without encryption…" | The folder was set up without a passphrase. Leave the field empty, or use a new, empty folder. |
Moving to a new phone
When you first open Kevyt on the new phone, choose I already use Kevyt: bring my data back. Then connect the same cloud folder (with the same passphrase), or import an export file.
Erasing
Erase all data (Settings → Data) deletes everything from the app and disconnects the cloud folder, so the erased data isn't synced straight back. The files in the folder stay where they are; delete them in your storage if you want them gone too. Uninstalling the app also deletes your data from the phone.
iCloud Drive and Google Drive as cloud folders are planned for the release version. Details are in the privacy policy.
FAQ
Why did my weight go up even though I stuck to my plan?
Day-to-day changes of a kilogram or more are normal and are mostly water. Look at the trend and the weekly pace, not single weigh-ins.
Why is the forecast a range and not a date?
Because nobody knows the future exactly. The range shows what is likely, given how your weight has actually behaved, and the probability tells you how likely each goal is on time.
Why doesn't the AI just tell me the calories?
Language models are good at recognising food but unreliable at nutrition numbers. Kevyt asks the AI only what's on the plate and how much, and takes the nutrition values from its food list.
Do I need AI to use Kevyt?
No. Weight tracking, the dashboard, the food diary, recipes and manual meal plans all work without it.
Does Kevyt work offline?
Yes, apart from the AI features, the online product search and barcode lookup, and syncing with your cloud folder.
Can I use Kevyt on two phones?
Yes. Connect both to the same cloud folder under Settings → Backup and sync, and they stay in step each time you open the app.
I forgot my encryption passphrase. Can you help?
Unfortunately not: nobody else ever sees it, so nobody can recover it. A phone that's already connected keeps working, because it stores the key it made from the passphrase. But you can't connect a new phone to that folder. If you need to, disconnect and start over with a new, empty folder and a new passphrase.
Is Kevyt medical advice?
No. It's a tool for tracking and planning. If you have a health condition, are pregnant or breastfeeding, or have a history of disordered eating, talk to a doctor before starting.
Still stuck?
Write to admin@kevyt.ai. You can also find Kevyt on YouTube.